A log cabin can easily serve as a comfortable, year-round living space if you plan the build properly from day one. The most effective approach follows a clear sequence: select a wall thickness appropriate for your intended use, insulate both the roof and the floor, steer clear of makeshift fixes like foil or bubble wrap, ventilate properly to prevent moisture buildup, and only then size your heating system. If you only plan to store lawnmowers and garden tools, none of this is necessary. However, if your cabin will double as a garden office, playroom, or guest annexe, the following guide will keep you warm through the winter and keep your energy bills under control.
| Intended Use | Recommended Wall Thickness | Additional Insulation |
|---|---|---|
| Garden shed / tool storage | Any | Not required |
| Summer house (spring to autumn) | 19–28 mm | Not required |
| Home office, playroom, sauna, guest annexe, or full-time living space | 40–92 mm | Roof and floor insulation; wall insulation for year-round use or cold climates |
Budget garden cabins sold as standard summer retreats generally feature wall timbers between 19 mm and 28 mm thick. While cost-effective, they are designed strictly for fair weather and seasonal use between late spring and early autumn. Converting a garden building into an all-season workspace requires treating the building envelope as an integrated system: walls, roof, floor, glazing, and heating must all work together.
Wood is naturally a better insulator than concrete or steel, but solid timber alone cannot match purpose-made thermal insulation products. With an average thermal conductivity (λ) of around 0.12–0.13 W/(m·K) for spruce, an uninsulated solid log wall loses heat far more rapidly than a framed wall lined with mineral wool. The comparative figures below illustrate the difference.
Choosing the right timber profile and insulation package at the start saves you from expensive, disruptive retrofits later on. Our insulated, heavy-timber cabins are engineered specifically for comfortable winter use.
🏠 Explore insulated garden rooms
Direct from the manufacturer: over 20 years of experience, a 5-year warranty, and free delivery.
If you are planning to buy or build a log cabin in the near future, keep these five essential steps in mind.
Siting is the single most consequential decision when planning your cabin. Before starting assembly, evaluate your garden’s microclimate. Ideally, the cabin should enjoy natural shade during the hottest midday hours of summer while still catching low-angled winter sun. Orienting the main glazing toward the south is a popular strategy to maximise passive solar gain in winter. Mature trees, hedges, and masonry boundary walls can also act as natural windbreaks against bitter prevailing winds. Planting deciduous trees nearby offers the best of both worlds: dense foliage provides cooling summer shade, while bare winter branches let natural light and warmth filter through.
Ground conditions are equally critical. If certain parts of your garden tend to collect standing water or turn to mud after heavy rain, construct an elevated foundation or lay a well-drained concrete slab or paving-stone base. A foundation subject to periodic pooling exposes the subfloor timbers to persistent damp, which will quickly compromise both the wood and any underfloor insulation.
Log cabins are built from interlocking tongue-and-groove boards available in various thicknesses. If the structure is strictly for storage, wall thickness is secondary. If you intend to use it as a guest annexe, garden office, hobby room, outdoor sauna, or living area, aim for wall timbers between 40 mm and 92 mm thick. High-quality cabins use slow-grown Nordic spruce—a dense, tight-grained softwood that provides markedly better natural thermal resistance than faster-growing softwoods.
To show how wall thickness impacts thermal performance, the table below lists calculated thermal transmittance values (U-values, in W/m²K—where lower values indicate better heat retention) for solid timber walls. These figures assume a thermal conductivity of λ = 0.13 W/(m·K) for softwood, combined with standard internal and external surface thermal resistances (0.13 m²K/W and 0.04 m²K/W, respectively):
| Wall Thickness | Approximate U-Value (W/m²K) |
|---|---|
| 19 mm | 3.16 |
| 28 mm | 2.60 |
| 44 mm | 1.97 |
| 70 mm | 1.41 |
| 92 mm | 1.14 |
More than doubling timber thickness from 44 mm to 92 mm reduces heat loss through the walls by roughly 42%, as boundary air layers also influence overall heat transfer. While this is a substantial improvement, solid wood by itself still falls short of modern residential building codes. For example, Spain’s CTE DB-HE energy efficiency code sets maximum thermal transmittance caps for exterior walls in new residential buildings between 0.70 W/m²K (Climate Zone A, warmest) and 0.37 W/m²K (Zone E, coldest), with roofs capped between 0.50 and 0.33 W/m²K. If your cabin is intended for full-time residential use, review the building regulations for log cabins and verify local planning requirements.
For a dedicated home office with ample space for desks and equipment, our large log cabins built with 70 mm solid logs offer an ideal structural baseline.
What to avoid on your walls. As temperatures drop, owners often look for quick DIY insulation fixes. Online forums frequently recommend lining internal log walls with aluminium foil, plasterboard, or reflective bubble wrap. We strongly advise against this. Reflective bubble wraps often carry poor fire safety ratings. More importantly, solid log walls expand and contract continually in response to ambient humidity. Screwing rigid sheet materials directly to interlocking timber logs locks the timbers in place, preventing natural movement and causing logs to separate, bind, or warp.
There is also a technical flaw in this approach. Radiant foil barriers only function effectively when facing an enclosed, clear air gap. According to research from Natural Resources Canada, foil products installed without a dedicated sealed air cavity provide an operational thermal resistance between 0 and 0.62 m²K/W at best. Glued or stapled directly against solid timber, reflective foil provides virtually no thermal benefit. Fire safety is an even greater concern: multi-foil insulation manufacturer ACTIS, for example, lists an initial Euroclass F fire-reaction rating for its HYBRIS core material, expressly advising against exposure to open flames, heat sources, or sparks.
Starting with a substantial log thickness avoids these pitfalls. It allows the timber to breathe naturally while keeping installation simple with our roof and floor insulation kits.
When heavy timbers aren’t enough: multi-layer wall systems. For regular winter occupancy in colder inland climates, the most reliable approach is an engineered, multi-layer internal stud system rather than surface-glued materials. A high-performance wall assembly consists of a 70 mm solid log exterior, a secondary timber stud frame filled with 100 mm of mineral wool, a 12 mm ventilated counter-batten cavity incorporating a breathable membrane, and an 18 mm interior timber tongue-and-groove cladding finish. Speak with our technical team to verify whether your selected cabin model is configured for this upgrade.
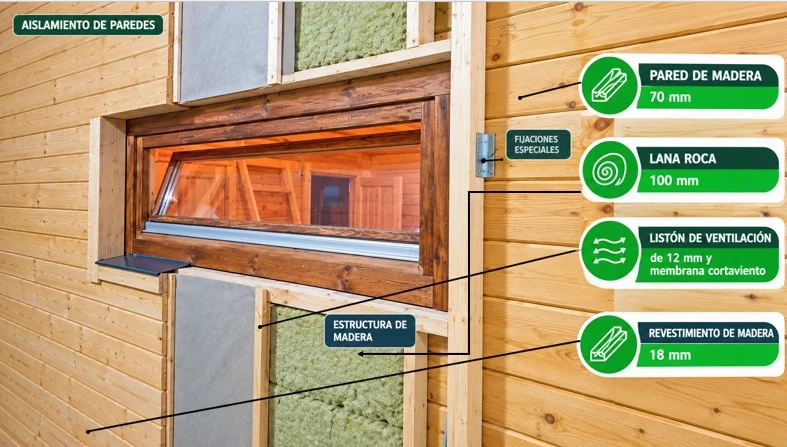
Using mineral wool with a typical thermal conductivity of λ = 0.035 W/(m·K), this build-up achieves an exceptional theoretical U-value of approximately 0.27 W/m²K (before minor thermal bridging through timber studs is factored in). This reduces wall heat loss to roughly one-fifth that of an unlined 70 mm log wall (1.41 W/m²K). The counter-battens and breather membrane preserve an uninterrupted air path behind the interior cladding, allowing ambient moisture to evaporate harmlessly.
Because warm air naturally rises, insulating the roof yields the highest return on investment of any weatherproofing measure and dramatically reduces heating bills. Roof insulation is easiest and most cost-effective to install while assembling the cabin.
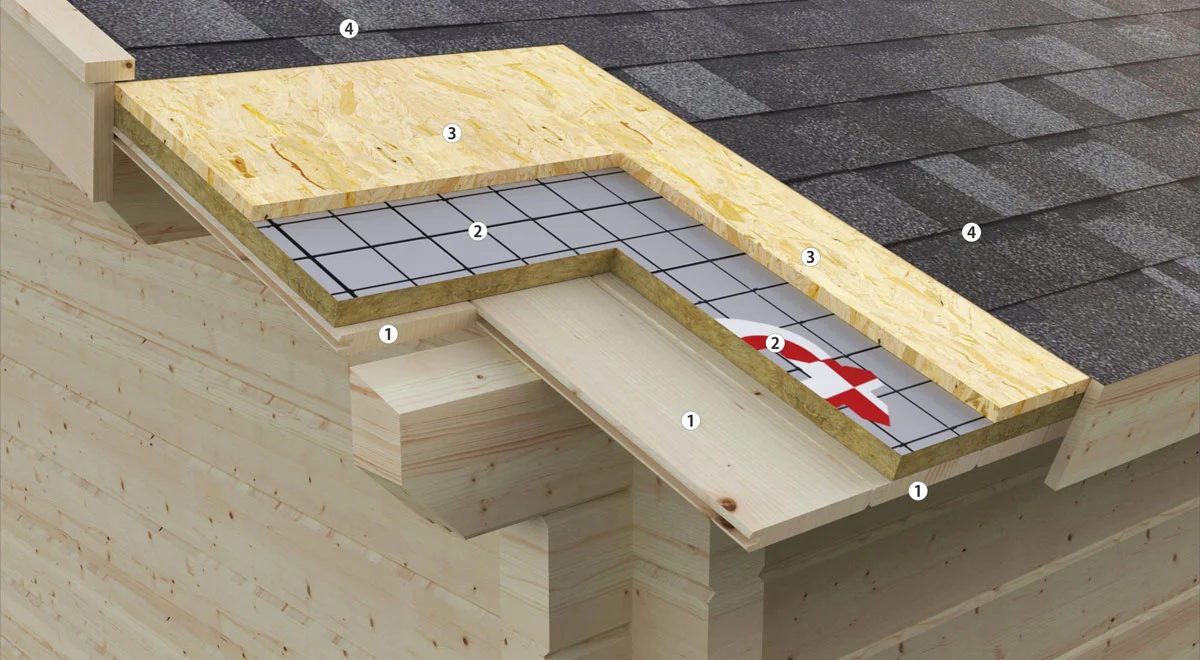
Consider the numbers: an uninsulated roof built from standard 21 mm timber boards yields an approximate U-value of 3.3 W/m²K (assuming standard upward heat-flow resistance of 0.10 m²K/W). Adding just 30 mm of insulation with λ = 0.035 W/(m·K) cuts that U-value to roughly 0.86 W/m²K—a heat-loss reduction of nearly 74%. Upgrading to high-efficiency rigid PIR boards with λ = 0.022 W/(m·K) lowers the U-value further to approximately 0.60 W/m²K. These figures reflect the insulation core alone; structural OSB decking and weatherproof roof coverings reduce heat loss even more.
Our modular roof insulation kit includes 12 mm structural OSB boards paired with 30 mm rigid insulation panels. Installation follows three straightforward steps:
If your cabin is already built, you can retrofit insulation beneath the roof between the rafters or purlins, or install an insulated suspended ceiling. The downside is reduced interior headroom and the loss of exposed decorative ceiling beams. In addition, internal ceiling retrofits require careful installation of an airtight vapour barrier to prevent indoor humidity from reaching the cold roof structure.
Much like the roof, the floor is best insulated during initial construction. We recommend adding the “Roof and Floor Insulation Kit” when ordering your cabin. The floor system uses 30 mm rigid boards fitted between the pressure-treated foundation bearers. Securing the insulation flush with battens or brackets ensures a level, draft-free base for the floorboards. Installation generally takes only 4 to 5 hours and guarantees your cabin is comfortable from day one.
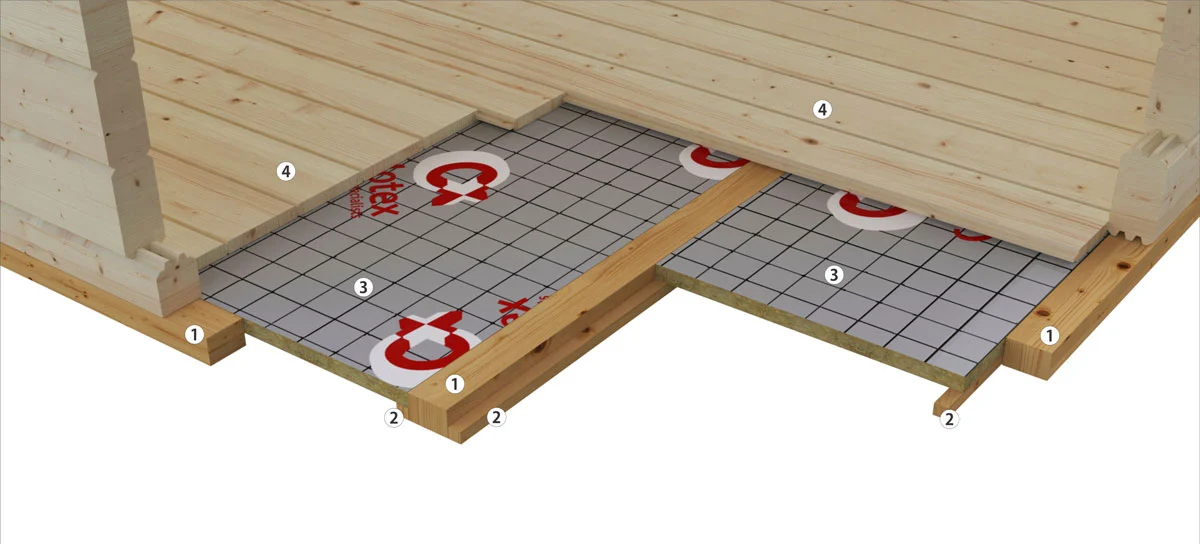
Floor insulation has an enormous impact on comfort: subfloor timbers sit directly above cold, damp ground air, and your feet are in constant contact with the surface. An uninsulated floor can make a room feel unpleasantly chilly even when the wall thermostat reads a comfortable 20 °C. If you are budgeting a new garden build from the ground up, our guide to building a cost-effective log cabin breaks down where insulation fits into total construction costs.
With the roof and floor properly insulated, simple interior detailing can eliminate drafts and prevent lingering heat loss. Area rugs are a practical, budget-friendly measure that immediately improves underfoot comfort and enhances room acoustics. Natural wool rugs are especially effective: they feel luxurious underfoot, hold up well to daily use, are naturally hypoallergenic, and provide greater inherent fire resistance than synthetic alternatives.
Windows and doors deserve equal attention. All our year-round cabins feature double-glazed window and door assemblies as standard. However, small drafts often slip past the perimeter joints between pre-hung frames and log walls. Seal any structural settling gaps with low-expansion flexible polyurethane foam, and install durable weatherstripping along door rabbets and opening window casements. If you do not plan to install fixed heating right away, keep a thermostatically controlled portable electric heater on hand for cold mornings.
Whether you are insulating the roof, the floor, or building an internal stud wall, the primary specification to review is thermal conductivity (the λ-value). The lower the λ-value, the better the material resists heat transfer per millimetre of thickness. Below are typical declared values alongside the thermal resistance (R-value, in m²K/W—where higher is better) for a 30 mm layer, matching our standard kits:
| Material | λ-Value (W/m·K) | R-Value for 30 mm (m²K/W) |
|---|---|---|
| PIR (polyisocyanurate) | 0.022 | 1.36 |
| XPS (extruded polystyrene) | 0.027–0.031 | 0.97–1.11 |
| EPS (expanded polystyrene) | 0.030–0.038 | 0.79–1.00 |
| Rock wool (mineral wool) | 0.032–0.037 | 0.81–0.94 |
| Glass wool | 0.032–0.044 | 0.68–0.94 |
| Wood fibre board | 0.036–0.040 | 0.75–0.83 |
| Expanded cork | 0.036–0.040 | 0.75–0.83 |
Always consult the manufacturer’s technical data sheet for product-specific ratings. Where floor depth or roof clearances are tight, low-conductivity rigid boards like PIR or XPS deliver the highest thermal performance in the slimmest profile. If you plan to install a wood-burning stove or high-output heater nearby, check the Euroclass reaction-to-fire rating on the product’s technical sheet, and avoid uncertified insulation foams or unbacked foils.
The more airtight and well-insulated a timber structure becomes, the more important ventilation and moisture management become. Condensation occurs when warm, moisture-laden indoor air penetrates the building envelope, hits a cold exterior surface, and cools past its dew point. Trapped within enclosed cavities, moisture causes timber decay, mould growth, and loss of insulation performance.
Protect your cabin by following three basic principles:
Wood is naturally hygroscopic, absorbing and releasing ambient moisture as atmospheric conditions shift. Research from Oregon State University shows that structural timber at equilibrium with 50% relative humidity maintains an internal moisture content of roughly 9–10%, rising to 15–16% at 80% relative humidity. This natural process explains why log walls continually expand and contract with the seasons, and why framing systems must always accommodate timber movement.
Once wall thickness and structural insulation are dialed in, you can accurately calculate heating requirements. Several heating options work well in timber outbuildings, each with distinct advantages.
Electric heating is the most practical choice for garden rooms: installation requires only standard mains electrical circuits. It generates zero combustion fumes, needs no fuel storage, and simplifies fire safety. Popular and effective electric options include:
Calculating required heating output. As a general rule of thumb, well-insulated garden rooms with standard ceiling heights require around 50–70 W/m² of heating capacity. For a 15 m² garden cabin, that translates to a heater output between 750 W and 1,050 W. In standard home construction, heating demand in milder coastal zones (such as Cádiz, Málaga, or Valencia) is estimated at 30–45 W/m², increasing to 45–60 W/m² in cooler regions (such as Barcelona, Bilbao, or the central plateaus). Because single-envelope timber cabins lose heat somewhat faster than cavity-brick dwellings, calculate equipment sizing toward the upper end of these ranges or consult a qualified heating engineer.
While electric heaters offer low upfront costs and simple controls, other heating systems provide lower long-term running costs. If your cabin does not have plumbed water lines requiring continuous frost protection, a compact wood-burning stove is an attractive option. Stoves involve a higher upfront investment and require a proper flue installation, but seasoned cordwood is affordable, and a real fire provides unmatched warmth and ambience.
When adding a wood-burning stove to a timber building, fire safety must be your top priority. Maintain a minimum clearance of at least 40 cm between the stove body and any combustible timber surfaces, and always verify the clearance distances specified in the stove manufacturer’s manual. Line adjacent timber walls with non-combustible thermal shielding, and hire a certified chimney sweep or HETAS-equivalent professional to install an insulated twin-wall flue system through the roof.
Rooftop solar panels are another viable long-term investment: they generate clean, renewable electricity to run panel heaters or heat pumps. While photovoltaic arrays require significant initial capital, they drastically cut ongoing operating costs. Because solar generation drops during overcast winter days, always back up solar systems with a mains hookup or dedicated secondary heating source.
A cabin built with 70 mm wall logs and fitted with factory-engineered roof and floor insulation requires minimal energy to stay warm all winter long. We can also customize wall configurations and dimensions to match your project.
Backed by over 20 years of manufacturing expertise and a 5-star Trustpilot rating.
With an appropriate wall thickness, an insulated roof and floor, balanced natural ventilation, and an appropriately sized heat source, a quality timber cabin remains comfortable and inviting in the depths of winter. If you need advice on selecting the right cabin model, retrofitting insulation, or calculating heat loads, contact our technical team today—we are always happy to help.
For a garden office, gym, or guest accommodation, choose wall timbers between 40 mm and 92 mm thick and install roof and floor insulation kits. A solid 70 mm timber wall provides an approximate U-value of 1.41 W/m²K; in cold inland regions or for daily winter occupancy, we recommend pairing heavy logs with an insulated internal stud wall.
We advise against it. Multi-layer radiant foils require an enclosed, unventilated air cavity to deliver meaningful thermal resistance, offering negligible performance when stapled directly against solid wood. In addition, many thin foil products carry poor reaction-to-fire ratings, and fixing rigid sheet materials directly across interlocking logs restricts the natural seasonal movement of the timber.
Installing our 30 mm rigid floor insulation kit between the pressure-treated foundation bearers takes roughly 4 to 5 hours on average. Because the insulation sits beneath the subfloor boards, it should be installed during initial assembly. We strongly recommend ordering the insulation kit alongside your cabin.