Damp in a garden shed almost always stems from one of three culprits: airborne condensation, rainwater leaks, or rising damp from the ground. Because each issue requires a fundamentally different solution, pinpointing the exact source before buying treatments or dehumidifiers will save you both time and money.
When assessing timber health, the single most critical metric is wood moisture content (WMC). Under European standard EN 335, keeping wood moisture below 20% ensures the risk of mould, wood-staining fungi, and structural rot remains negligible. Once timber stays above that 20% threshold, fungal decay quickly takes hold.
| What You See | Likely Cause | First Step |
|---|---|---|
| Water droplets on the ceiling or windows on cold mornings, without recent rain | Condensation | Set up cross-ventilation and never store damp equipment inside |
| Localised damp patches or drips during and after rainfall | Water ingress via roof, joints, or windows | Inspect roof felt/membranes, perimeter sealant, and guttering |
| Dark, wet lower wall boards accompanied by an earthy, musty smell | Rising damp from the ground | Improve subfloor airflow, raise the base, and install a damp-proof membrane |
To accurately diagnose the problem, inspect your shed at three distinct moments: early on a chilly morning, immediately following heavy rainfall, and after a dry stretch of five to seven days.
For a definitive diagnosis rather than guesswork, invest in a pronged wood moisture meter. Readings sustained above 20% require immediate intervention. Bear in mind that surface mould can germinate even earlier: industry body TRADA notes that mould spores can colonise timber once moisture reaches roughly 18% under favourable temperatures.
Ambient relative humidity is just as critical. Research highlighted by Swedish Wood demonstrates that spruce timber stored at 80–83% relative humidity resists fungal growth, but mould readily takes hold once humidity hits 86% and stays there.
A timber building engineered with purpose-built ventilation, thick 18–28 mm tongue-and-groove floorboards, and pressure-treated foundation bearers eliminates damp problems from day one. Browse our extensive range of precision-milled Nordic spruce garden sheds.
Direct from the manufacturer with over 20 years of experience and a 5-year warranty.
Condensation occurs when warm, moisture-laden air hits a cold surface that sits below the ambient dew point. Consider these real-world examples:
This explains why a shed’s ceiling can “sweat” profusely despite a completely watertight roof. Daily habits exacerbate the issue: rolling in a wet lawnmower, drying garden gear, or running an unvented gas or paraffin heater pumps litres of moisture straight into the air.
In an unheated garden shed, passive cross-ventilation is your best defence. By creating a continuous stack effect, cooler outdoor air enters near floor level, warms slightly, absorbs airborne moisture, and vents out near the roofline on the opposite wall.
To set up an effective ventilation system:
Good habits make a substantial difference. Always hose down and dry garden tools and mowers before storing them, keep cardboard boxes off timber floors, and leave a clear gap between free-standing shelving and exterior walls.
In a reasonably sealed shed, an electric dehumidifier can lower humidity levels, but its efficiency plummets in draughty outbuildings. Furthermore, standard compressor dehumidifiers stop working effectively when ambient temperatures drop below 10–15 °C; an unheated shed in winter requires a desiccant model.
Disposable calcium chloride moisture traps can protect small cupboards, but they fill quickly and turn into corrosive brine. Silica gel packs are only suitable for sealed storage tubs. Ultimately, auxiliary drying aids cannot overcome poor ventilation, roof leaks, or a waterlogged base.
Timber in direct contact with wet ground or porous concrete acts like a sponge, drawing groundwater upwards through capillary action. Correcting subfloor dampness after the shed is erected is difficult, so getting the foundation right during installation is essential.
Follow these foundation fundamentals:
A common DIY mistake is backfilling garden soil, bark mulch, or gravel directly against the lower wall timbers or concrete base on sloped ground. This traps moisture against the wood and blocks subfloor ventilation. Similarly, never seal off the open perimeter beneath a shed mounted on adjustable pedestals or timber ground posts.
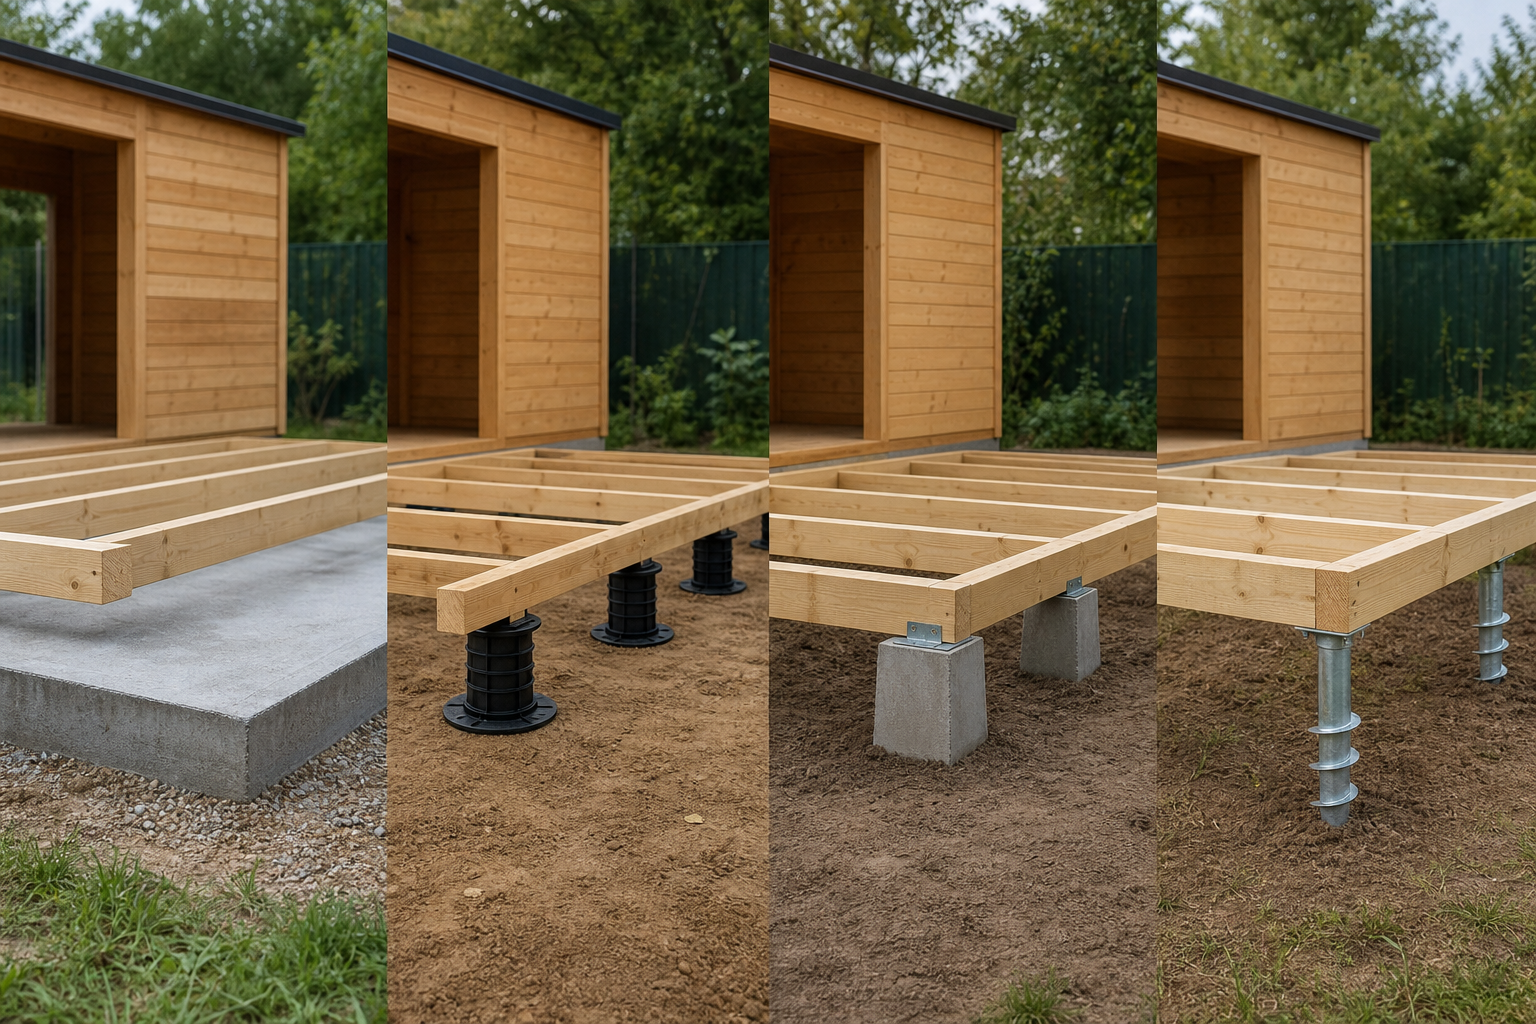
For advice on choosing between a concrete slab, adjustable pedestals, timber subframes, or ground screws, consult our shed base guide alongside our comprehensive guide to foundations for log cabins.
Head inside your shed during a heavy downpour to trace active leaks:
Installing perimeter guttering prevents rainwater from cascading off the eaves and saturating the vulnerable bottom wall boards. Review step-by-step installation instructions in our guide to installing gutters on a shed.
Never jump straight to cleaning without first addressing the underlying moisture problem; mould will simply return within a few weeks.
Remember that wood treatments protect the surface against opportunistic spores—they do not replace ventilation. Even a top-tier microporous stain cannot stop damp if warm, wet air remains trapped inside the shed.
If you can easily push the tip of a screwdriver into a timber board, or if rot has penetrated structural corner logs or floor joists, surface treatment is no longer an option. Cut out and replace the compromised timber immediately.
If you use your garden building as a home office, craft workshop, or fitness room, human respiration and space heaters rapidly raise indoor moisture levels. While warm surfaces help keep internal walls above the dew point—which is why insulating roofs and floors makes a massive difference—insulation must always be paired with adequate ventilation.
Under Eurocode 5, Service Class 2 covers unheated, ventilated timber buildings where equilibrium wood moisture content stays below 20%. Introducing regular heating and occupancy alters this dynamic, shifting the building into a different hygrothermal environment.
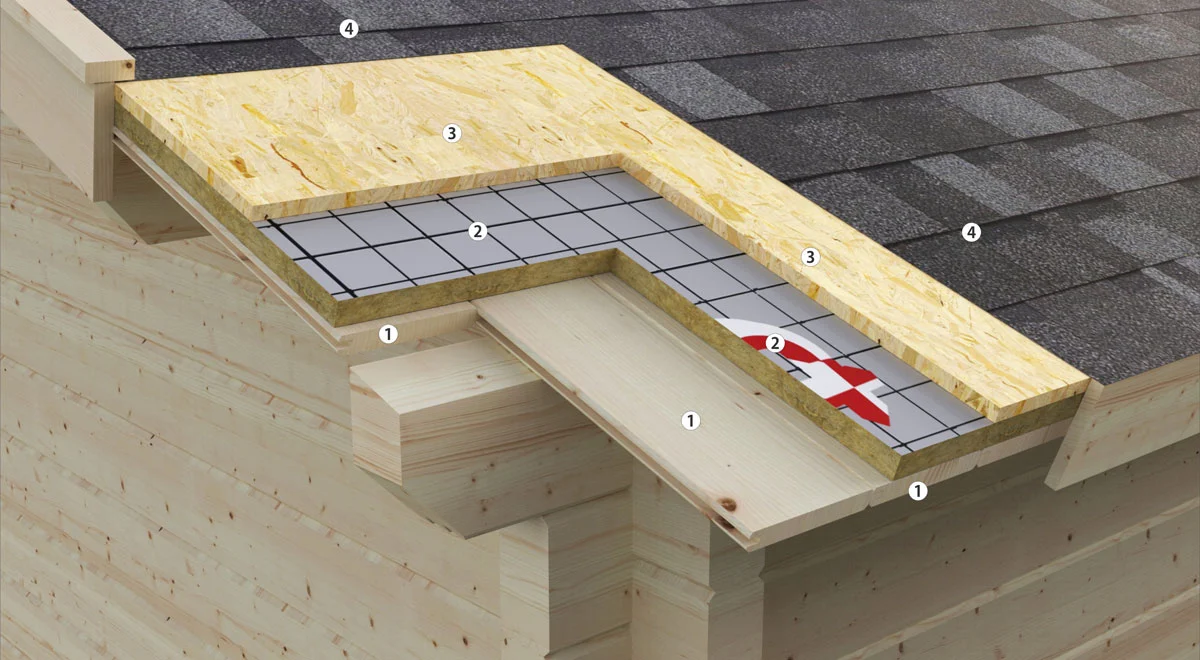
When insulating a timber roof, always leave a continuous ventilated air cavity of at least 50 mm between the insulation boards and the underside of the exterior roof deck. This allows moisture to vent harmlessly into the atmosphere rather than rotting your roof boards from the inside out. For full details on build-ups and vapour control layers, read our guide on how to insulate your garden shed roof and floor.
Our premium insulated garden rooms feature factory-fitted double glazing, precision-engineered timber wall profiles, and optional thermally modified timber cladding. Avoid the hassle of DIY vapour barriers and start with a structurally sound, four-season outbuilding.
🏠 View insulated garden buildings
Free delivery, 5-year warranty, and rated 5 stars on Trustpilot.
Conquering shed damp requires no miracle cures—just a logical approach. Track down the moisture source, fix your foundation and roof detailing, establish robust cross-ventilation, and protect your timber with breathable stains. Keeping that moisture meter reading comfortably below 20% is the ultimate guarantee of a clean, rot-free garden shed.
A sustained moisture level above 20% creates prime conditions for wood-decay fungi and dry rot. Surface mould can develop at levels as low as 18% if temperatures are mild and airflow is poor. Regularly test several areas of your shed with a moisture meter, paying close attention to floorboards and the lowest wall logs.
They can help control minor ambient humidity in a well-sealed room, but their capacity is very limited. They cannot keep up with unsealed draughts, roof leaks, or ground damp rising through an unprotected base. Address the root cause of dampness first before relying on dehumidifiers.
You should avoid it until the dampness is completely resolved. Steel tools will rust rapidly, and cardboard acts as an absorbent food source that quickly fosters mould colonies. If you must store metal tools, wipe them dry, hang them on tool racks off the floor, and store sensitive items in sealed plastic containers.