
The most common mistakes made when assembling a wooden garden room or a log cabin.
1. Storing packages on an uneven surface or on grass
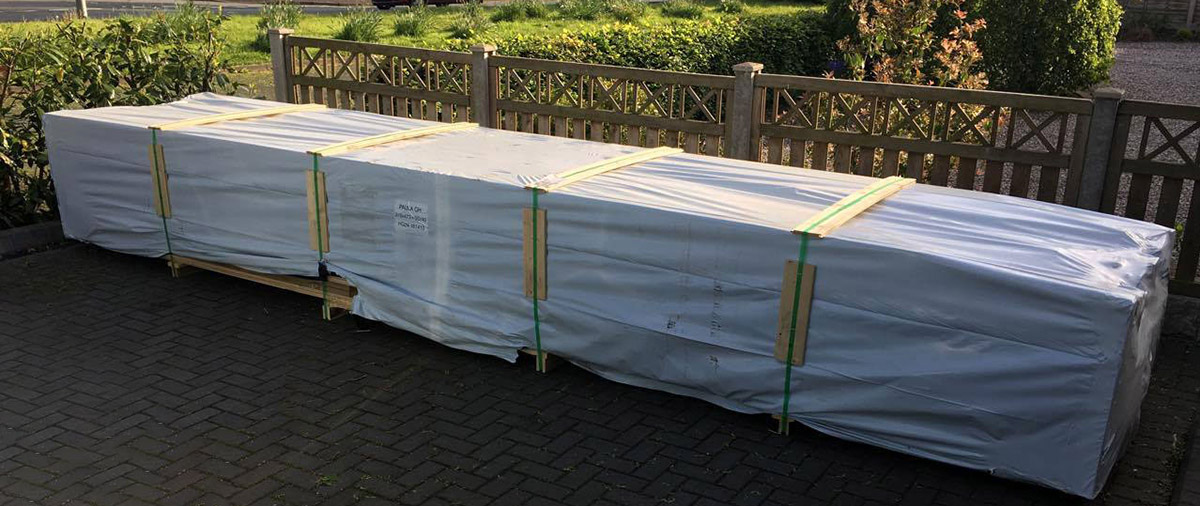
Our waterproof packages should be stored on a flat surface. Otherwise, the wooden parts will warp. Packages should not be stored on grass for long periods (more than two weeks), although they are covered with plastic. The plastic will only cover the top of the package, but the materials on the bottom will be exposed to moisture. They should also not be left in the sun for long periods, as the wood can warp within a few days.
2. Beginning assembly without first sorting the materials
All parts should be sorted and checked before assembly. Wall beams, floorboards, roof boards, joists, windows, and doors should be separated and the number of components should correspond to the drawings and packing list.
3. Not following the assembly plans
You should strictly follow the assembly plans and check where exactly each component goes. The pre-drilled holes in the wall planks for the metal reinforcing rods are marked on the plans and must be positioned on top of each other. If you do not do this, you will not be able to insert the reinforcing or storm rods in the later stage.

4. Lack of general knowledge or previous experience of building sheds
All the components of the cabin kit have been measured and cut to size at the factory, except for some floor and roof boards, posts and other pieces (these are designed to be cut to size during the assembly process). This makes assembly easier and avoids complications, but does require some prior knowledge and experience. If in doubt, we advise you to hire a local professional or use our professional installation services. Our YouTube video demonstrates the assembly of a garden shed and gives an overview of the assembly process.
5. Inadequate or poor-quality foundations
Like any other type of house, a log cabin should be built on a proper foundation. The correct foundation depends on the location, terrain, size, and purpose of the shed. The preferred foundation types are concrete slabs, logfoot foundation kit, posts, concrete blocks or adjustable plastic raisers. Regardless of the type of foundation, the base must be level, stable and constructed according to the size of the shed. Do not be tempted to build an uneven foundation to drain water. This is not necessary and will cause problems during assembly and over the lifetime of the cabin. If necessary, we will send you the plans of the shed before delivery. Here, you can read about different types of .
6. Not installing the roof cover
All wooden cabins need a suitable roof cover to protect them from moisture. We strongly recommend a long-term solution such as Icopal’s extra durable roofing felt (for a flat or pitched roof) or bitumen roofing shingles (for an apex roof). The roof cover is not included in the basic kit and whether you buy it from another supplier or choose our product, it is essential to protect the your garden room or any other log cabin with suitable materials.
7. Insufficient wood protection
As soon as you have finished building your log cabin, you should apply paint or any other wood preservative. All interior and exterior surfaces must be protected, including window frames and battens, doorways, and interior walls. Wood preservatives should only be applied to dry surfaces, never in wet weather.
8. Preventing wallboards from settling when installing pipes, cables, or furniture
Ideally, if you need to fix something to the wall, it should be done on a single board to avoid pushing different parts of the wall together. This allows the shed to settle down freely and evenly. If you cannot avoid fixing something (such as cables) to different parts of the wall, you may need to temporarily remove the fixings if there are gaps between the boards to allow them to settle. Once the boards are back in place, you can reattach the items. You should always leave at least 5-6 cm of space between the ceiling and high furniture or other items, because during the first and second year your log cabin is settling down approximately 3-4 cm.
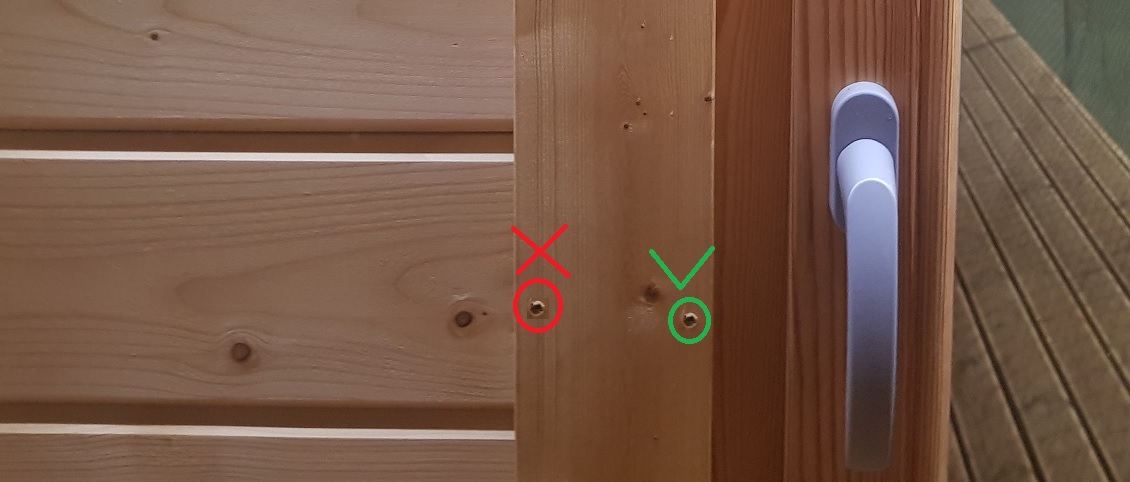
9. Fastening window and door sills to the wallboards
Window and door frames should not be screwed or nailed to the wallboards, but only to the corresponding door or window frame. Fixing them to the wall will restrict the the log cabin settling down and create gaps between the wallboards.
10. Not installing or tightening the storm poles
Our timber cabins with a wall thickness of 44 mm or more are supplied with metal rods that are inserted through the entire wall. You must fit a washer and nut to the top end of the rod, insert it through the pre-drilled holes in the wall beams and secure the bottom end with a washer and nut. Tighten manually as much as possible. The lower end nut should be tightened every 1–2 months for the first year and every 3–4 months thereafter.

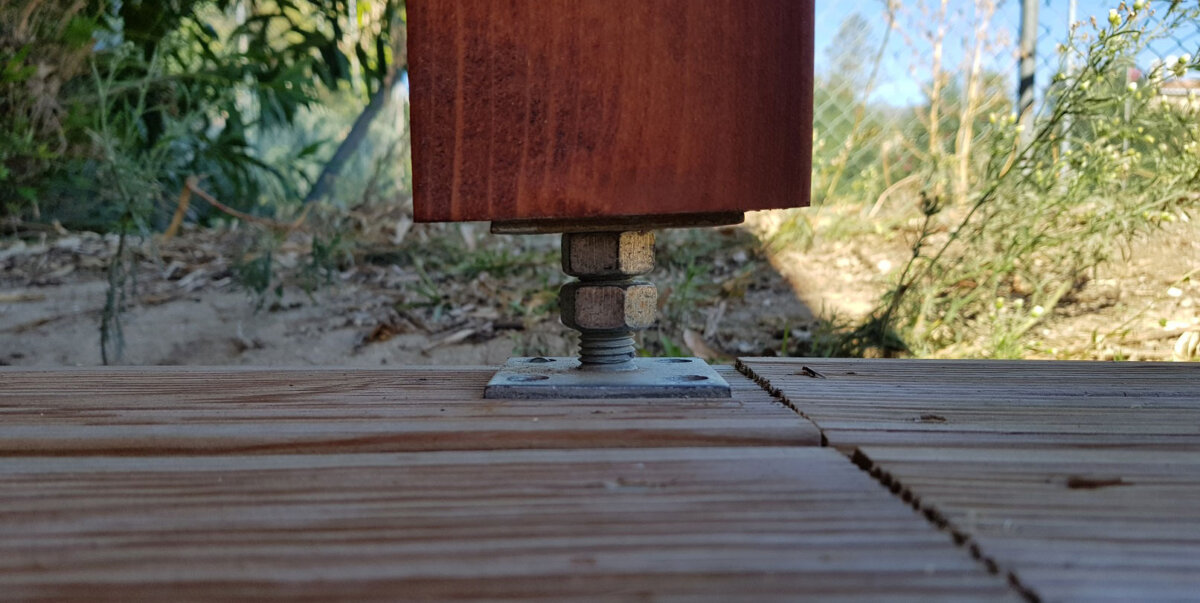
11. Not adjusting the posts
If the cabin has a canopy with support posts, each post must be measured, cut to size, and placed on the substructure so that it is 6-8 cm above the ground to allow access to the bottom of the post. This allows you to adjust it later. The post bracket has a nut for adjustment using a wrench.
Maintenance of a timber cabin – what to keep in mind
1. Apply two coats of paint or wood preservative as soon as the assembly has been completed. It will need to be reapplied in the future, on average every 6-7 years, according to the paint or preservative manufacturer’s instructions. The entire exterior and interior surface must be treated, including entrance doors, interior walls, window frames and slats.
2. Storm braces should be adjusted every 1–2 months for the first year. The nut should be tightened manually without using a wrench. Only if the nut has rusted is it permissible to use a wrench.
3. Depending on the house, the joists may consist of in two pieces with connecting bolts in the middle. If this is the case, use a socket wrench to tighten the bolts.

4. Never join boards together by securing them with sheathing or insulation battens. If you do install any of the above, use only floating battens and leave a minimum of 7 cm to allow for movement.
5. It is normal for wood (especially solid wood) to have cracks and knots. This is completely natural and does not affect the structural integrity of the shed, nor does it mean that the product is faulty or of poor quality.
6. If the floor of the shed is not insulated, small gaps may appear between the floorboards, depending on the temperature and humidity of the environment. These may require adjustment.
7. Canopy support posts must be adjusted when the shed is in place, using a wrench to tighten the nut on the substructure. If the posts are too high, the shed will not sit evenly, and cracks may form between the wall planks. Then you need to lower the post(s).
8. Although the doors and windows of our garden sheds are of good quality, they are not designed for residential use. In some exposed areas, moisture may appear in extreme weather conditions, such as when the wind pushes rain horizontally. You can prevent this by using silicone or rubber seals behind windowsills and door jambs. This is part of the general maintenance and Casetas de Jardín 24 does not carry out, even if you have hired our installation service.
9. Doors and windows need to be adjusted occasionally to ensure that they work properly. The door and window frames are smaller than the corresponding openings to allow the house to settle. The spaces should not be filled with material such as polyurethane foam for the first two years, although this can be done later.
